Speaking of Seek Position == LIVE, is there a way to jump to this in the Timeline tab? I know F1 jumps to the Live tab, but I want to jump to "now" in Timeline tab.
Right now I get current by toggling to the Live tab and back to Timeline tab, but that seems inelegant.
Would Up Arrow, if there are no clips newer than the current playhead position, be a reasonable choice for this?
It is not easy to implement the hotkey that way, because the current behavior is for UI3 to tell Blue Iris to jump to the next event, and UI3 doesn't know what timestamp that is, or if there even is a next one.
It is not easy to implement the hotkey that way, because the current behavior is for UI3 to tell Blue Iris to jump to the next event, and UI3 doesn't know what timestamp that is, or if there even is a next one.
It is not easy to implement the hotkey that way, because the current behavior is for UI3 to tell Blue Iris to jump to the next event, and UI3 doesn't know what timestamp that is, or if there even is a next one.
You can only do that from the local console, in the camera settings > PTZ > Edit presets. Select a preset there and click the little photograph button and BI will capture a new thumbnail.
You can only do that from the local console, in the camera settings > PTZ > Edit presets. Select a preset there and click the little photograph button and BI will capture a new thumbnail.
Darn, okay. Maybe I'll get around to emailing BI support to add an API endpoint to make it possible. Thumbnails sometimes randomly disappear so would be nice to have a quick way to save new ones.
Another Q..
Is there a way to remove dead/empty space between cameras and stack them tightly instead of evenly spacing them out? Perhaps through css (for a specific group)? The thought being to set up a group with a few cams that has a big empty space at the lower right that I can overlay other stuff on.
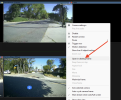
In UI3, right click the group video, choose Group Settings. There, you can disable Fit to Viewport and lock in a specific aspect ratio. Tune to your taste.
In Blue Iris local console, click the Edit Layout button in the top bar next to the group list dropdown.
Then right click in the camera area to edit the layout settings. Some of the settings in the context menu apply to the camera you right-clicked; some apply to the layout as a whole.
In Blue Iris you can add a new camera and in the Video tab choose Device type > Screen capture > Blackness. Then type the resolution you want in the Size box below. You can add text or image overlays to this or just use it to inject some black space into your layout. You should also specify a frame rate in the "Max. rate" box. I use 2 FPS for one of mine that displays basic date/time and weather data.
In UI3, right click the group video, choose Group Settings. There, you can disable Fit to Viewport and lock in a specific aspect ratio. Tune to your taste.
In UI3, right click the group video, choose Group Settings. There, you can disable Fit to Viewport and lock in a specific aspect ratio. Tune to your taste.
In Blue Iris local console, click the Edit Layout button in the top bar next to the group list dropdown. View attachment 241007
Then right click in the camera area to edit the layout settings. Some of the settings in the context menu apply to the camera you right-clicked; some apply to the layout as a whole.
In Blue Iris you can add a new camera and in the Video tab choose Device type > Screen capture > Blackness. Then type the resolution you want in the Size box below. You can add text or image overlays to this or just use it to inject some black space into your layout. You should also specify a frame rate in the "Max. rate" box. I use 2 FPS for one of mine that displays basic date/time and weather data. View attachment 241009
In UI3, right click the group video, choose Group Settings. There, you can disable Fit to Viewport and lock in a specific aspect ratio. Tune to your taste.
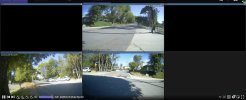
I'm not sure if this is related or not, but is there a way to configure 3 cameras such that I get one on top and two on the bottom? These are my 3 mailbox cameras:
The bottom camera, RainbowRidge, would logically fit in between the other two, but more logically on above them rather than below them. Is this possible? Thanks!
@TheWaterbug Assuming the camera aspect ratios are all the same, you can probably fudge it with the Anamorphic (force size) option (camera properties) to tweak the aspect ratio ever so slightly so that #1 is wider than #3. Then #2 will jump down since it fits better in the lower row. For example, if your sub stream is 640x480 (stretched to 16:9), you could tell it 856x480 on #1 and 854x480 on #2 and #3.
@TheWaterbug Assuming the camera aspect ratios are all the same, you can probably fudge it with the Anamorphic (force size) option (camera properties) to tweak the aspect ratio ever so slightly so that #1 is wider than #3. Then #2 will jump down since it fits better in the lower row. For example, if your sub stream is 640x480 (stretched to 16:9), you could tell it 856x480 on #1 and 854x480 on #2 and #3.
Hrm. In the midst of attempting this, I somehow dragged one my cameras out of the frame in the Edit Layout view of the BI console, and it moved itself into some other set, as another #1, and I can't figure out how to get back into the same set. It's still part of the group, and if I remove and and re-add, it still back to being this "other" #1.
Sorry this isn't strictly UI3-related, but does anyone know how to fix this?
edit: I found it. I needed yo uncheck this box: Open in Desktop Frame:
In Blue Iris you can add a new camera and in the Video tab choose Device type > Screen capture > Blackness. Then type the resolution you want in the Size box below. You can add text or image overlays to this or just use it to inject some black space into your layout. You should also specify a frame rate in the "Max. rate" box. I use 2 FPS for one of mine that displays basic date/time and weather data. View attachment 241009
And now I think this is the answer to my first question, which is to create two black "padding" cameras to flank the camera I want to be top-center. I'm trying to figure out what the right sizes are. If I create 2 at 848 x 480, I get the top camera centered in the top row (good), but the whole group is wider than I want it to be, which is exactly the width of the two bottom cameras, side-by-side. If make them narrower, say 424 x 480, BI tries to "help" me by scaling them up and messing up my layout:
In all of my clicking around I also created a 6th phantom object that BI wants to include the layout, e.g. effectively forcing 3 x 2, so the bottom two are pushed to the left instead of being centered.
Indeed, all I'd know how to do is what you are already trying. When you've created your fake narrow/tall cameras, go into Blue Iris's layout editor and right click the fake cams and make sure they were not assigned a "Height" of "2x" as Blue Iris has been known to do with cameras it thinks are rotated/portrait.
Indeed, all I'd know how to do is what you are already trying. When you've created your fake narrow/tall cameras, go into Blue Iris's layout editor and right click the fake cams and make sure they were not assigned a "Height" of "2x" as Blue Iris has been known to do with cameras it thinks are rotated/portrait.
I figured it out. My problem was that, in all my experimentation I had clicked Align to grid in the console's group layout mode:
That was causing both problems, e.g. the scaling up of the half-width dummy images and the left-alignment of the lower 2 cameras. Once I unchecked Align to grid I got the arrangement I wanted, then I shrank the window to eliminate any space between, turned off Fit to Viewport in UI3 Group Settings, and now I have exactly the view I want at any browser window size:
Thanks! I hope someone else finds this useful as well.
And now my OCD wants to rotate and align all 3 cameras so they match up . . . .
@TheWaterbug Assuming the camera aspect ratios are all the same, you can probably fudge it with the Anamorphic (force size) option (camera properties) to tweak the aspect ratio ever so slightly so that #1 is wider than #3. Then #2 will jump down since it fits better in the lower row. For example, if your sub stream is 640x480 (stretched to 16:9), you could tell it 856x480 on #1 and 854x480 on #2 and #3.
In UI3, right click the group video, choose Group Settings. There, you can disable Fit to Viewport and lock in a specific aspect ratio. Tune to your taste.
In UI3, When I right click on any camera (in a group... while live view, or timeline, or clips are selected, ) and choose "Group Settings", all I see is:
I can't seem to find any place with the settings choices you talk about... someplace else?


")