Dahua WizColor 5x59-PRO and SmartLight 5x59-IL new series

... For most situations auto mode should work best... day/night/infrared/white led ...
yeah. was just playing with manual and it's fine during the day but really auto looks excellent for me ... so just switched back to auto for now.

We had a delivery last night and the delivery guy was crystal clear at night ... will continue to play, but I may just stick with auto in the short term.

This new T54PRO is very close to the front door so it's excellent at covering the front stoop ... and so much better in low light then the other front camera (5442 non S3) but that's much further away from the front door where the lighting is. The 5442 will get replaced with one of the next two T54PRO's that are now on order ...
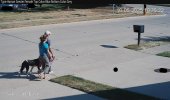
post that video of my UPS man.
 
Does anyone else change the "main stream" resolution (Camera->Encode->Resolution) from native 2688x1520 to another resolution such as 2560x1440 or 1920x1080 ... and seeing some blurriness?

I set this to 1920x1080 on my 5442-S3 ... so did the same on the T54PRO-ZE ... but the images from the later (pulled via ffmpeg ... which is what is often used under the covers for NVR's, etc.) are noticeably blurrier and there appears to be some goofy jpeg compression going on ... which may explain some of my struggles last night.

I also see this if I simply use the web browser and do Live View. Same for 2560x1440.

HOWEVER, if I do 2688x1520, there's a noticeable improvement ... and just to confirm this, I use Snapshot to grab a 2688x1520 image, resized it in Photoshop to 1920x1080 ... and compared that to a Snapshot at 1920x1080 ... which was much worse on the T54PRO-ZE.

I did the same with my 5442-S3 (basically same scene) and the difference (doing a resize via Photoshop versus letting the camera do it) is minor ... but not near as much as the T54PRO-ZE.


So my theory (for now!) is that the internal camera resizing algorithm of the T54PRO-ZE may be different (and noticeably worse) than then 5442-S3. Or I could be doing something stupid! ;-)
And yes, the encode parameters were the same in all tests.
 
Last edited:
Does anyone else change the "main stream" resolution (Camera->Encode->Resolution) from native 2688x1520 to another resolution such as 2560x1440 or 1920x1080 ... and seeing some blurriness?

I set this to 1920x1080 on my 5442-S3 ... so did the same on the T54PRO-ZE ... but the images from the later (pulled via ffmpeg ... which is what is often used under the covers for NVR's, etc.) are noticeably blurrier and there appears to be some goofy jpeg compression going on ... which may explain some of my struggles last night.

I also see this if I simply use the web browser and do Live View. Same for 2560x1440.

HOWEVER, if I do 2688x1520, there's a noticeable improvement ... and just to confirm this, I use Snapshot to grab a 2688x1520 image, resized it in Photoshop to 1920x1080 ... and compared that to a Snapshot at 1920x1080 ... which was much worse on the T54PRO-ZE.

I did the same with my 5442-S3 (basically same scene) and the difference (doing a resize via Photoshop versus letting the camera do it) is minor ... but not near as much as the T54PRO-ZE.


So my theory (for now!) is that the internal camera resizing algorithm of the T54PRO-ZE may be different (and noticeably worse) than then 5442-S3. Or I could be doing something stupid! ;-)
And yes, the encode parameters were the same in all tests.

All WizColor / AI-ISP cams have TOTALLY different video workflow comparing to older Dahua cameras.. Many settings works very different... The same was on TIOC-PRO (34PRO)...

You can try to enable full WDR (with values >= 50) - it reverse some (not all) original Dahua video processing - to test different resolutions on main channel.
 
  • Like
Reactions: JDreaming and alekk
As always, I appreciate your expert commentary @steve1225 and I've seen you mention that, but I didn't realize that (assuming my observations are correct) this would effect simple resizing.

I'm planning to work around it by simply have my ffmpeg script pull the native resolution and then do the resize myself. Which arguably I should have been doing in the first place, but it was handy to have the camera do it, plus saved me some bandwidth.

P.S. I'm also seeing some difference in White Balance and 5442-S3 appears to do a bit more color saturation than the T54PRO-ZE.

why you want to resize? you should use native resolution...

you can try also check if third stream (which can be resized) have the same problem?
 
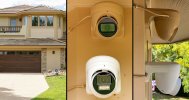
Sorry to be a bit "post-happy" with my "new toy", but thought people might like seeing the 5442-S3 and T54-PRO-ZE side-by-side deployed in the field.

As others have pointed out, it's bigger (ditto the new PFB2203 Wall Bracket) but unless you have a really tight spot, should be a drop-in.

The wiring harness is a bit bulky (I put electrical tape on the ends of everything) ... but it all "fits" in there ... although I'd recommend getting the camera pointed in "about" the right direction before you stuff it all in there. I didn't do this and wasn't able to tilt the camera enough (cable was probably preventing) so had to remount it ... albeit that's super-easy to do (and I'll have to do again when I paint things) and it's no problem doing it by yourself while up on a ladder ... nice work Dahua

2025_10_04_5442-S3_T54PRO-ZE.jpg


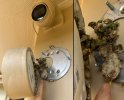
BTW, there was a 7 year old Vivotek Hikvision 5526 camera in that location before that ... so figured it was worth showing the "crud" that got in the back-side of the camera (there was also some inside I didn't get a picture of) from all that time. I think most of this was brought in by insects since the location is fairly sheltered. I'm sure others have seen worse in the bazillions of installations they have done.

2025_10_04_Camera_Grunge.jpg
 
Last edited:
Insects? More like a long-standing squirrel social club, passed down through generations.
While we have plenty of squirrels here and they can get into interesting places, I've never seen one in that area ... and it wouldn't be super easy for them to get there. However, I have seen an occasional bird land on the cameras ... and (especially on sunny summer days), there are often wasps (they nest under my concrete roof tiles) so I think that would be the main contributor to all that "gunk". I should have looked closer and done an "inventory" on what was there - I'm sure some dried up spiders as I've seen those in electrical outlet boxes, etc.

It may not have been clear from the picture, but the back of the camera (it's actually a placeholder for the camera) was screwed down fairly tight against that silver mounting plate ... so it would have required something pretty darn small to get in there. It's not completely air-tight ... so probably some dust & particles carried by the wind that somehow worked their way in there ... although again, that's in a semi-sheltered place.

There was also some stuff "upstream" of that ... which is more hermetically sealed with rubber gaskets - pretty amazing what bugs can get into, especially if they are looking for a warm place on a cold night.
 
I have 5442 S3s varifocal. I'd like to try the IPC-Color4k-T but how do I use my current varifocals to determine whether I need 2.8mm or 3.6mm? I have a couple of varifocals slightly zoomed in, so does that mean 3.6mm? The rest would be 2.8mm obviously.

You can do it manually without the cameras. Get a largish piece of scrap card ie A3 ideal, and a maths protractor. Draw baseline at near and parallel to widest edge (straight line) and put a dot on it in the centre in felt pen. This is the spot you're going to put the protractor on. Put the protrators base line centre position on the dot with the base of the protractor on or parallel to the baseline you drew. Find out the relative angles of each of the lens from their specs eg might be 30 degrees and 40 degress. Mark off these angles fron the 90 degree line of the protractor. ie for 30 degrees, you want 15 degrees each side, so at 15 degrees each side, put a dot then using a ruler draw a line through these dots from the baseline dots to the end of the card. This is then the view of your Xmm lens. Using a different colour pen, (you could eg use red for one, blue for the other (sharpies or similar are ideal as felt lines are easier to see with what we're going to do next)), repeat the marks for the next lens XXmm so eg if 40 degrees, you'd measure and mark 20 degrees each side of the 90 degree angle. Again using the different colour draw a line with a rule from the base line spot to the edge of the card.

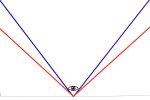
What you could have now is 2 sets of lines each coming out from the baseline spot looking like the part of a baseball diamoond where the guy who's batting stands. 1 set of line should represent one angle, and the other set, the other angle. It should look like this:

CCTV Filed of View Test Card Illustration.jpg

Now go stand under your camera position, hold the cardboard up to your face and put your eye in line with the centre spot, ie where I've put the eye symbol. You shoudl be able to look along the flat surface of the card (hence bright colours, thick lines) and the fan shaped lines of each colour will show you what field of view you're going to have. Just look along one set of lines and imagine the lines further out and see what you can see, and repeat for the other set. This is crude but roughly accurate. It also enables you to decide on how you might want to orientate your camera when chosen when putting it up without having to constantly adjust the screws (although you may need to fine tune it by doing this when you have it up in the rough direction you want).

Obviously a wider angle with give you more field of view and capture more close in. However be aware a narower field of view has a higher pixel density so will give a better picture further out or if you want to zoom in to an object not immediately in front of the lens. So what you want is the lens with the narrowest view you can that still captures everything you need to protect. If this means going so wide that it is likely to compromise objects further away and further away is important, then you may need to consider mounting in a different position that allows the use of a narrower lens or consider using 2 camera instead of one.
 
  • Like
Reactions: alekk
You can do it manually without the cameras. Get a largish piece of scrap card ie A3 ideal, and a maths protractor. Draw baseline at near and parallel to widest edge (straight line) and put a dot on it in the centre in felt pen. This is the spot you're going to put the protractor on. Put the protrators base line centre position on the dot with the base of the protractor on or parallel to the baseline you drew. Find out the relative angles of each of the lens from their specs eg might be 30 degrees and 40 degress. Mark off these angles fron the 90 degree line of the protractor. ie for 30 degrees, you want 15 degrees each side, so at 15 degrees each side, put a dot then using a ruler draw a line through these dots from the baseline dots to the end of the card. This is then the view of your Xmm lens. Using a different colour pen, (you could eg use red for one, blue for the other (sharpies or similar are ideal as felt lines are easier to see with what we're going to do next)), repeat the marks for the next lens XXmm so eg if 40 degrees, you'd measure and mark 20 degrees each side of the 90 degree angle. Again using the different colour draw a line with a rule from the base line spot to the edge of the card.

Obviously a wider angle with give you more field of view and capture more close in. However be aware a narower field of view has a higher pixel density so will give a better picture further out or if you want to zoom in to an object not immediately in front of the lens. So what you want is the lens with the narrowest view you can that still captures everything you need to protect. If this means going so wide that it is likely to compromise objects further away and further away is important, then you may need to consider mounting in a different position that allows the use of a narrower lens or consider using 2 camera instead of one.
Thanks for this thoughtful and thorough response, but I'm way too dumb to understand and do this.
 
@CCTVCam's advice is very good ...and if you step through carefully what he wrote, it will provide the "real" answer.

Some forum posts here and here that may be useful to 'ya. Note the first one is specific to the 5442. There's also a Focal Length Calculator.

@EMPIRETECANDY's website has specs - here's the 5442 (aka T54IR-ZE) which shows a FOV of H:115°–47°; V:62°–27°; D:137°–54° ... whereas the T54PRO-ZE is showing H:114°–48°; V:59°–27°; D:143°–56°

He also had the 2.8/3.6mm fixed focal cameras specs there.

As an aside, I have the 5442 and T54PRO-ZE next to each other ... and for a similar FOV, I have 1400 and 1650 (respectively) for the zoom setting.
 
As it stands right now, I guess I don't have enough light to make this camera work in color at night, trying to cover my sidewalk, end of driveway, etc.. zoomed all the way. Within 15 or 20 feet would probably work, but the 4k cams work better for me in that area.

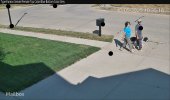
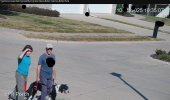
During the day it works great, really no problems. Here is people walking from this PRO cam, and two 7 series cams. The PRO (17) is about 50 feet away. 7 series (18) 60 feet. 7 series (15) 50 feet. All approximate.
d17105.jpg

I tried setting to self-adaptive, but holy heck.. that's BRIGHT. I'll try setting it that way tonight just to see if I can capture people clearly or not. Or I might just set it to b&w and see how it does in the front. :shrug:

After tonight, I'll move this cam either to the front porch, replacing a 4k cam, and using it in color 24/7 and using the mic etc... as kind of a doorbell cam.
Or, I'll move it to the backyard, which has little light. This would replace a version 1 5241, and would be b&w at night. I'm leaning towards this just because the 4k front porch does a great job, and I'm interested to see how this does in b&w in low to no light.
 

Attachments

  • d18105.jpg
    d18105.jpg
    611.1 KB · Views: 22
  • D15105.jpg
    D15105.jpg
    669.1 KB · Views: 21
As it stands right now, I guess I don't have enough light to make this camera work in color at night, trying to cover my sidewalk, end of driveway, etc.. zoomed all the way. Within 15 or 20 feet would probably work, but the 4k cams work better for me in that area.

I tried setting to self-adaptive, but holy heck.. that's BRIGHT. I'll try setting it that way tonight just to see if I can capture people clearly or not. Or I might just set it to b&w and see how it does in the front. :shrug:

After tonight, I'll move this cam either to the front porch, replacing a 4k cam, and using it in color 24/7 and using the mic etc... as kind of a doorbell cam.
Or, I'll move it to the backyard, which has little light. This would replace a version 1 5241, and would be b&w at night. I'm leaning towards this just because the 4k front porch does a great job, and I'm interested to see how this does in b&w in low to no light.
need to see some video

even with a lil light, you should be fine.
 
need to see some video

even with a lil light, you should be fine.
I couldn't get a good picture with exposure set to 0-4, it just wasn't enough light. I adjusted iris etc.. as well. As I stated, I think this would be great up to 20 feet or so, maybe 30? But trying to capture person at 50 feet just won't work for me.

Overview, front porch? Yep. it will also probably be great for no light in b&w. I personally need a 8-32 zoom for what I'm trying to do in capturing my mailbox, sidewalk etc...

Hopefully the 8-32 PRO will be coming out soon.
 
  • Like
Reactions: JDreaming
I couldn't get a good picture with exposure set to 0-4, it just wasn't enough light. I adjusted iris etc.. as well. As I stated, I think this would be great up to 20 feet or so, maybe 30? But trying to capture person at 50 feet just won't work for me.

Overview, front porch? Yep. it will also probably be great for no light in b&w. I personally need a 8-32 zoom for what I'm trying to do in capturing my mailbox, sidewalk etc...

Hopefully the 8-32 PRO will be coming out soon.

That sounds about right for ANY 2.8-12mm VF. I wouldn't expect the 54PRO VF to be any different in that regard. It may be brighter but its not going to change the physics of a 12mm lens

The porch/door coverage or close-in driveway coverage is what I'm waiting for as this would be the normal use for a 12mm VF

Really that 3ft to 15ft in a dark environment is where it should shine. I need to see if its better than the 3449PRO
 
Last edited:
  • Like
Reactions: JDreaming
That sounds about right for ANY 2.8-12mm VF. I wouldn't expect the 54PRO VF to be any different in that regard. It may be brighter but its not going to change the physics of a 12mm lens

The porch/door coverage or close in driveway coverage is what I'm waiting for as this would be the normal use for a 12mm VF

Really that 3ft to 15ft in a dark environment is where it should shine. I need to see if its better than the 3449PRO
I compared the new T54PRO-EZ to my 3449PRO, which I have overlooking my front door. The result its that I like the 3449PRO more for that application. The 3449PRO has much better (more evenly spread) illumination in complete darkness, and the image is great. For me, the T54PRO-EZ is better as an overview camera for the yard and where something longer than the 3.6mm 3449PRO is needed.