Triple Headed, Pole Top, Turret Cam Mount

guykuo

Getting comfortable
Jul 7, 2018
758
2,290
Sammamish, WA
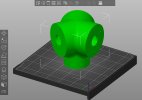
I wanted to change the top of one camera pole to have three turret cameras instead of two cameras currently mounted.
The prior, two headed mount I printed in black PETG has held up well through several years weather.

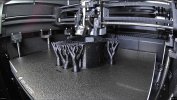
It's going to take a day and a half to print in PETG. 1/4 of the way through....
 

Attachments

  • Screenshot 2025-06-14 at 23.49.01.jpg
    Screenshot 2025-06-14 at 23.49.01.jpg
    450.7 KB · Views: 0
  • Screenshot 2025-06-14 at 23.48.25.jpg
    Screenshot 2025-06-14 at 23.48.25.jpg
    1.5 MB · Views: 0
A couple hours in Fusion 360 to do the modeling. No AI assist, just CAD modeling. I cheated a bit by basing it off my two camera pole mount.
Hardest part was getting all the cuts and intersections to keep the three upper mounts emptied out in their interiors.

13 hours into the print...
.Screenshot 2025-06-15 at 04.44.38.jpg
 
22 hours done, about 7 more to go. The top portion will be interesting because I'm printing the vaulted ceiling without using supports, unlike the horizontal portions at base that absolutely required supports. The top of the circular opening, I know my printer is tuned well enough to print successfully, but the ceiling is something else due to the unusual angles of three cylinders merging together and long overhangs.

You can see one of the mounting bolt holes. On the interior side of those holes, I designed hexagonal recesses into which nuts will be pressed into place to accept camera mounting bolts.

The striped appearance is due to the printer's LED lighting strip having discrete emitters.

22 hours.jpg
 
Last edited:
Total of nearly 28 hours print time. Here it is atop a pole with three turrets on the newly printed mount. A POE+ splitter within the mount lets one ethernet service all three turrets.
Still need to add a brim to newest turret.

Three other cameras on the pole are mounted using standard mounting hardware. I think my pole topper looks better than the strap on, commercial mounts.
three cam pole top.jpg
 
I am working on designing a double mount to possibly swap out my roof Color4K-T180s with Color4K-Ts. How did you seal the holes for the pig tails? I see the silicone for the base of the mount, but can't guess what you did inside.

I am considering attaching the printed mount to a PFA-130, but also can't figure out how I would access the interior bottom of the mount to tighten the hardware to the PFA cover. I could make the pig tail holes larger, to give access, but then I have large, non-sealed holes. My only thought is a removable plate where the pig tail would pass through, allowing enough access to get to the hardware.

Any thoughts?
 
How did you seal the holes for the pig tails? I see the silicone for the base of the mount, but can't guess what you did inside.
Just a very thin ring of plumber's under base of camera mount is all I did. The entry hole for the pig tail isn't further sealed. I treat the inside connections with silicone grease, like any other camera connection. Despite rain and wind exposure for several years in my dual camera mounts., I've not had signs that the inside of the printed mount gets appreciably wet. It pretty much is a well sheltered environment inside the mount.
 
  • Like
Reactions: looney2ns
Originally I was going to make the housing with the cameras forward facing, but it has evolved to be like your old dual camera mount, with them on the sides. I am mostly happy with it so far, but need a solution to fill the 64mm hole on each side that gives access to the interior for bolting it to the PFA-130 lid. I wouldn't be as concerned with weather intrusion if there wasn't the potential for a POE extender to be inside the housing to power both cameras with a single ethernet.