I'm sure this is a beaten to death question so I apologise in advance! Every house is different so its hard to get a real idea based off other peoples layout
So I would like to be able to capture the main entry points and I am wondering if I will make this work with my chosen camera locations and camera count of 4.
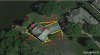
The Yellow is the angle I was hoping to cover with the cameras.
Distances -
Left side of image- shed to the Door 1 is approx. 25ft.
Camera 1 to Door 1 is approx 65ft.
I am leaning towards HIkvision colorvu 4k bullets (4mm, 4mm and 2 x 6mm but just read up on the HDW5442 which seem pretty great
Would appreciate any and all advice
Is the four camera count do to budget constraints or simply wanting to try things out?

Nothing wrong with installing a few key cameras before a big (staged) roll out.

As noted by others the Hikvision ColorVu Cameras offer incredible night time (low light) video. When the internal LED’s are turned on they offer daylight video at night. Depending upon your needs and environment these cameras offer a great all in one solution which provides light, microphone, and nighttime colour video.
Having said this, I would balance the next roll out with some IR enabled 1/1.8 - 1/1.2 cameras. This will offer (almost) best of both worlds of low light colour performance and complete darkness IR video when needed.
Some things to consider before the deployment.
- FOV: Get up on a ladder and take photos and video of all future placement to get a general idea of what can be seen. Ideally you would just order a single camera and walk around with a long cable and mount it to a test rig. This would provide you real world samples of what can / can’t be seen with the cameras on hand.
- Walk Test: Every camera position should be validated by a walk test. This test will mimic walking, fast pace, and running during the day & night. This will help you determine how each camera needs to be adjusted and dialled in to provide a clean video free of motion blur / ghosting. Take a license plate, eye chart, colour wheel, and mark off defined distances to better understand what can / can’t be seen day & night.
- Mounting: Even if your soffit is metal based invest the time and materials to install correct wooden blocking. Doing so now insures a secure mount which is harder to remove and also allows you to install much heavier cameras in the future without any worries about soffit sag or fall out.
A pro tip is to always use some quality 3M double sided tape on the mount. This will allow you to get the base in the right spot while screwing it down and not have to worry about dropping anything or needing a 3rd hand!

Always have a thick blanket under your work space to catch any screws or possible hardware drop!

- Big Pull: If you’re going to be pulling cable invest the time and materials to run a extra spare Ethernet drop. Doing so now will allow you to install the second / third phase of hardware with much less effort!
I always recommend pulling 22-4, 18-2, 16-2, 12-4, in specific areas & zones while the big pull is under way. This will allow you to install any future accessory such as microphones, DC lights, speakers, access point.
This is also a good time to consider pulling 120 VAC lines for flood lights, X-MAS lights, etc.
- Safety: If you’re going up the attic sit down and write out a list of items you need. Do not go into the attic space midday only in the early morning or evening when it’s cooler.
Get hydrated and do the 2P’s prior to going in!

Things to bring and wear in the attic:
Go to the dollar store and get a few sets of their paper jump suits. If they have a hood even better. Wear shorts and T-Shirt. Wear a respirator / N95 mask, gloves, safety glasses, knee pads. Get a head lamp if you don’t have one and always bring in a flood lamp so it can be hung up high for better visibility.
Carry extra flash light . . .
Always double check your footing and move the insulation to insure you’re on the roof beams and not on drywall.
Bring a small section of OSB plank so you can sit / kneel down easier and for extended periods of time.
Suspend the wires on the trusses and secure the cable at defined intervals no longer than six feet and don’t lay the cable on the ground / ceiling!

This will make your life easier if you ever have to go back up to do repairs or maintenance and not worry about locating or damaging cable. Leave enough service loop to move any hardware 4-8 feet in any direction if needed. While you’re at the dollar store or hardware store pick up some neon flag tape.
Write down in big numbers each camera zone and tie it to visual point with an arrow. In commercial installs we also use neon paint and spray the final install point with the camera number so it’s easier to locate at a far distance.
Tools: Side cutters, scissors, 33 speed tape, wire ties, bailing wire, sharpie, box cutter, multi screwdriver, pliers, staple gun, drill & bits, spade bits, hole saw, fish tape, string, fish weight.
Anything else is up to you!!
Bring a water bottle to stay hydrated and take breaks when needed! Carry a thermometer and pay attention to the temperatures if it’s getting close to noon get out of there!
Once done take lots of photos and rake up the insulation and spread it out evenly. Use something to confirm the depth like a broom stick handle with written intervals on painters tape every two inches.
Good Luck . . .


 Nothing wrong with installing a few key cameras before a big (staged) roll out.
 Always have a thick blanket under your work space to catch any screws or possible hardware drop!


